make: concrete candle holders

My friend Catherine gave me an awesome birthday gift. It was 7 months after my birthday, but worth the wait. She made me a kit to make concrete candle holders. I’ve been intrigued by the concrete crafting for awhile, but a little intimidated by doing it inside with out making a big mess. Having everything provided and a little bag of concrete gave me the confidence to try.

While I am a novice concrete crafter, this wasn’t the first time I’ve messed with concrete. My dad liked to drag me in to foundation, sidewalk, and floor pouring. So my experience was all on a much bigger scale.

img_0116

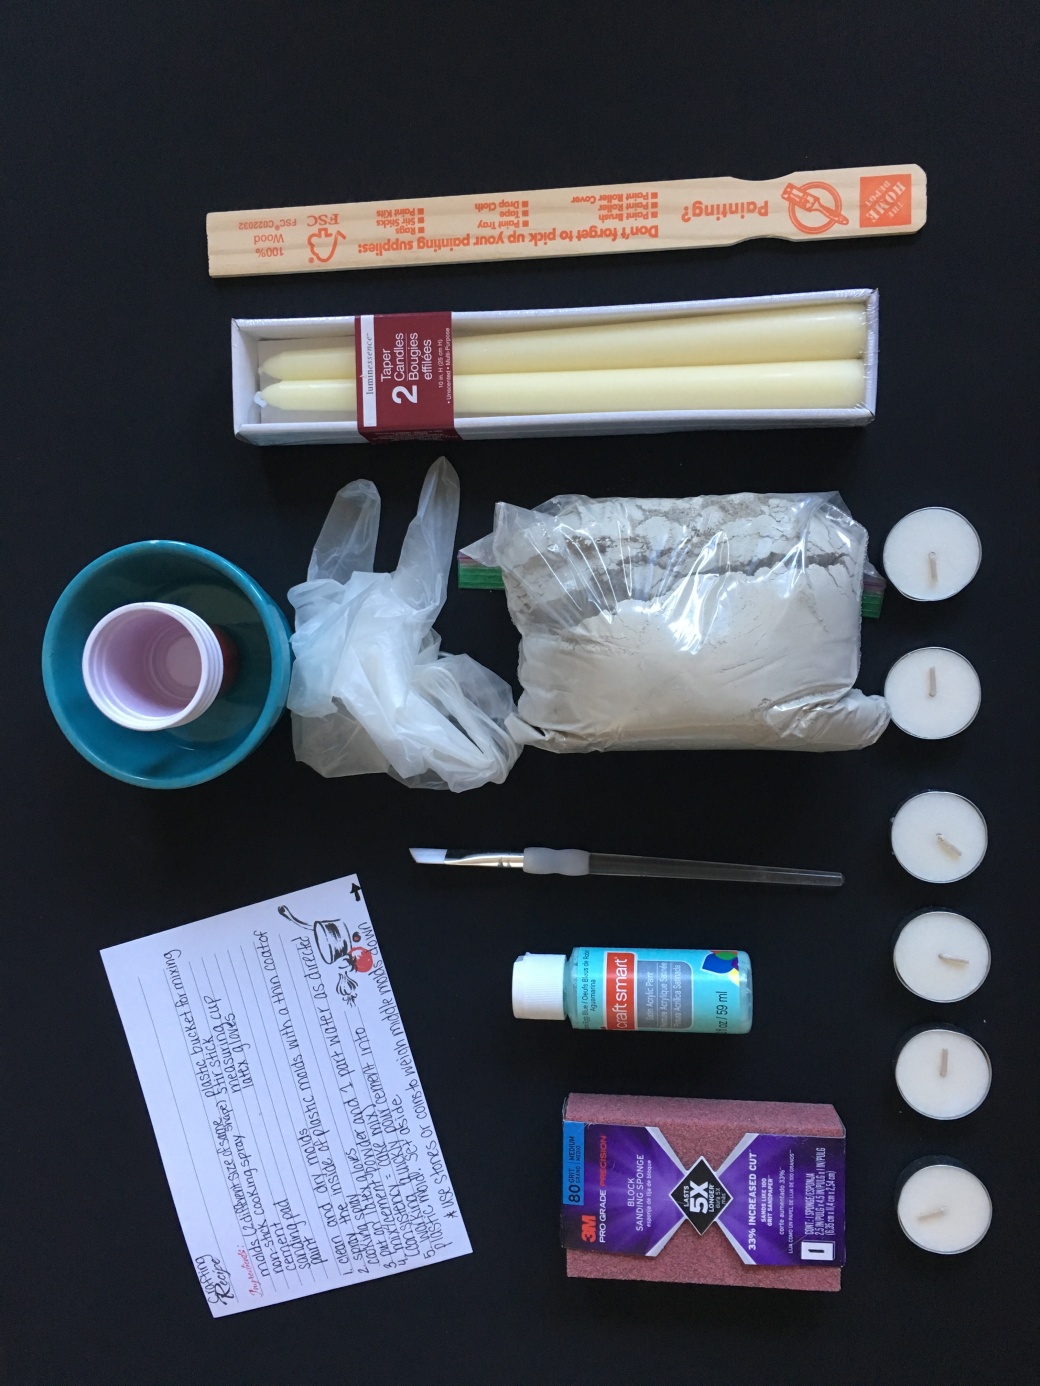
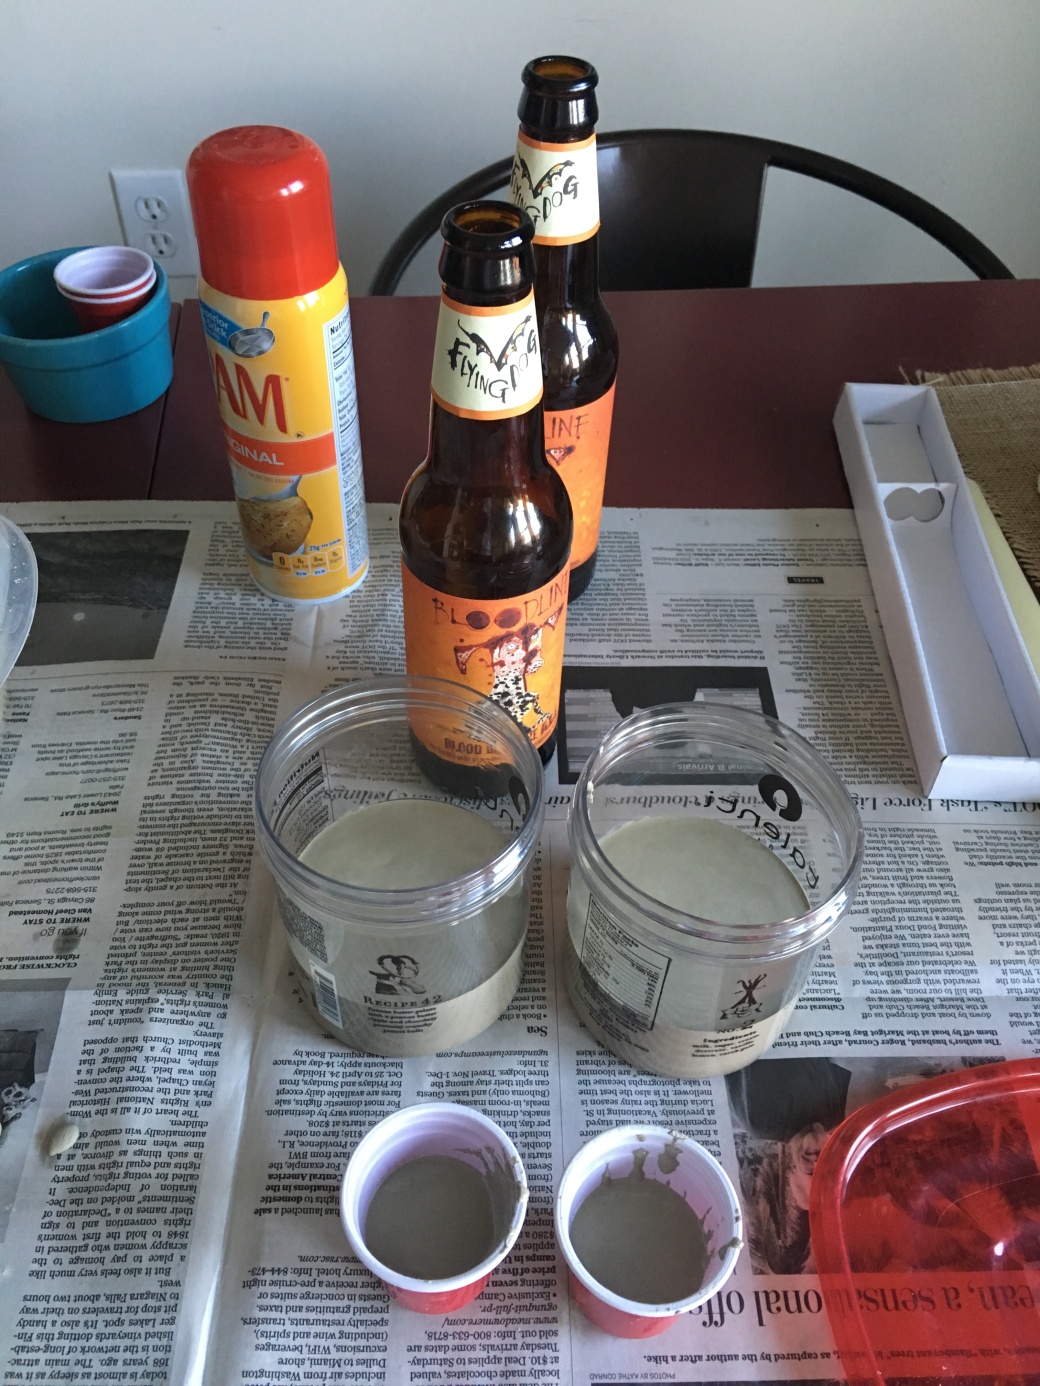
Catherine provided me some containers to use, but I decided to gather a few more. I decided to use the little solo cups for the tapered candles and gathered two gelato containers and two beer bottles to make holders for the votives.

After spraying the containers with cooking spray, I mixed the concrete and quickly poured it in the containers. The instructions said to wait around ten minutes for the concrete to set before sticking the inner container in, but if I did it again I would wait a little less. I used the candles themselves to create the hole in the little ones. I just stuck them in, but I later saw where you should wrap plastic wrap around them first. This seems like a smart idea, but mine didn’t get too dirty. For the gelato containers I stuck the beer bottles in. They were harder than I expected to stick inside (see above on the waiting less time) so I had to wiggle quite a bit and the sides came up unevenly. I decided that I liked the uneven look and pushed forward. After five minutes I pulled the bottles and candles out and let the concrete set a bit more.

img_0117

After about an hour I easily popped the the little ones out of the cups, but the larger ones presented more of a challenge. I think the plastic might of expanded a little bit due to the heat from the concrete setting and since the walls of the container were straight up and down and the top didn’t expand, they didn’t want to come out. After some tapping on the floor I got them to move a bit, then ended up cutting the bottom off using a box cutter and then pulled them out the bottom. So remember that when you’re choosing your mold.

img_0120

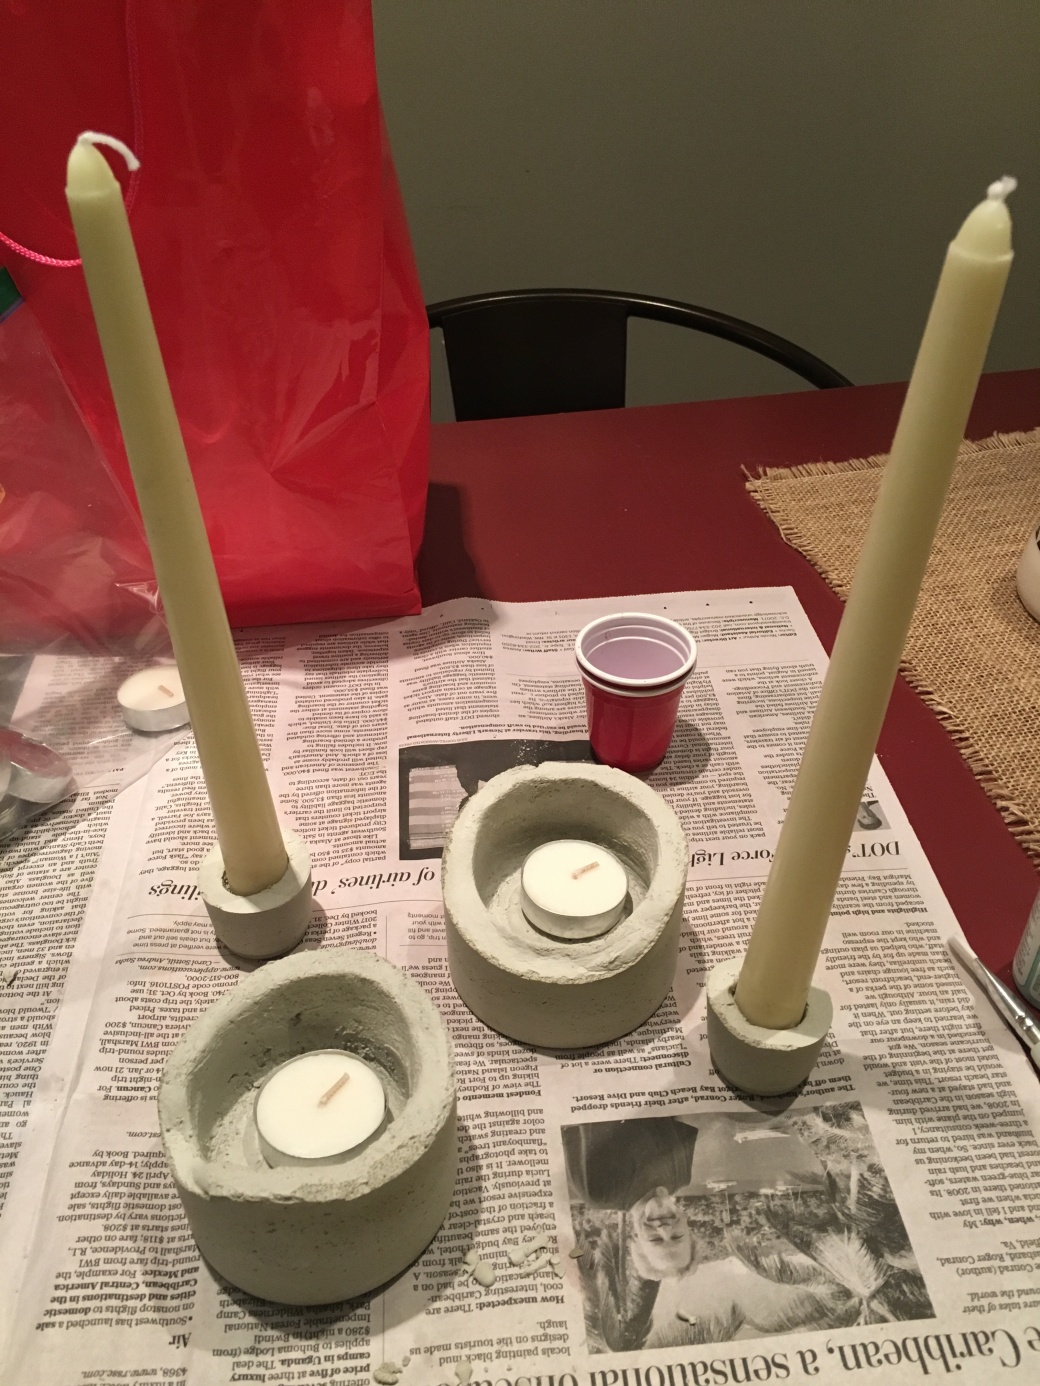
I liked the rough look so I didn’t really sand them at all, just knocked a few of the looser pieces off. Then I let them sit and cure for a week. A week is not necessary, it is just what happens sometimes. I used some painters tape to marking off a triangle on one and a straight line around the bottom of the other and painted a thin layer of acrylic paint.

img_0212

I think they turned out pretty cool, but I would like to try working with concrete some more now that I have a little experience.

make: tassel key chain

There is this store in DC called Salt & Sundry. They carry adorable stuff. Home decorating and entertaining stuff mostly. I always go in thinking that I will be getting something. I recently went in looking for a birthday gift and did my normal, “everything is so cute”. Only then to look at the price tags and gasp. Much of it is handmade so I do understand the  time and effort that goes in to making something by hand, but I can’t bring myself to pay some of the prices.

All of that to say I saw some cute leather tassel key chains today. They were leather and had a cute little metal number attached. So when I saw they weren’t $10 but more like $75 I was determined to come home and make my own. I kind of eyeballed the whole thing so I don’t have detailed instructions. I cut a rectangle, measured off the top section and drew a line, and cut strips to the line. I used leather glue and started by rolling the leather around a folded piece to attach the tassel and then just kept rolling to the end. The glue I used stuck pretty quickly, but you might have to hold it rolled up for a few minutes.

IMG_3234

IMG_3235

I attached my key chain and ta-da! Fancy key ring for free! Well for free today and since I bought this leather over 5 years ago from a scrap bin, and the glue and scissors were also pretty old and well used I say it was for well under $75.

IMG_3237

make: felt succulents

This past year I’ve become a terrible succulent owner. My succulents keep dying. I think the main reason is the light situation in my apartment.  We have morning light and not a lot of room by the windows so I’ll blame the light (and maybe a little bit on my sporadic overwatering).

So when I heard about felt succulents I was pretty excited to try making a plant that I couldn’t kill. There are plenty of tutorials out there if you need step by step instructions, but I’ll just share with you my interpretations.

My first attempt I just used the felt I had on hand. And it wasn’t exactly succulent colored. for the turquoise one I cut two sizes of petals/leaves and made a peak on the top. After creating a core I used a hot glue gun to glue the leaves on working in a circle. For the spike one I just cut tall triangles and glued them together in the same fashion.

IMG_3032

Then at my friend’s bachelorette party we did breakfast crafting. One of her other friends brought some amazing supplies. She had four colors of green felt, two types of moss, and little flower pots to put our creations in.

We cut styrofoam balls in half to fill the bottom half of the pot and then covered the ball with moss. I started with a little mossy spikey thing then decided to try a tall skinny plant. For the tall one I cut skinny strips that tapered at the end. Then I folded the bottom half in half (hotdog style) with glue to give each leaf a bit more support.

IMG_3143

I then made a wider and flatter guy. I made the core out of a rectangle piece then glued the rounded petal shapes around and around.

IMG_3144

I arranged my three succulents on top of the moss and added a little glue to keep them in place.

IMG_3147

Here is to hoping I can keep these guys alive!

make: bridal embroidered dish towels

IMG_2950

My friend Catherine is getting married! For her bridal shower I bought her a rolling pin off her registry, but wanted to add something a little more personal. I decided on embroidering some dish towels early on, but it took me a while to figure out what to put on them. I settled on a love theme and sketched a design on the towels using a water soluble pen.

IMG_2896

I picked thread colors to match the towels and got to stitching.

IMG_2898

I used the same split stitch for the whole design, with a few lazy daisies to decorate.

IMG_2917IMG_2914

make: Birthday T-shirt

For Brian’s birthday I decided to design him a logo. He has been sporting a beard for about 4 years and gets way more complements on it then I ever do on something I do with my hair. So I decided to incorporate it in to the design. And he turned the big 30 this year so his birth year and place were obvious additions. I designed it in SketchbookExpress and used the freezer paper method.

The small survey letters and numbers were a little harder to cut out. Luckily they smoothed themselves out when I used paint.

IMG_2609

This was the first time I used my white fabric paint, but it turned out great against the heather blue shirt.

IMG_2611


IMG_2612

take: 3 ways I’m like my Mom

  1. I like to make things.

When we see things we like we try to figure out how to make them ourselves. My mom is very talented in all things sewing and quilting and most other handicrafts. One year for  Christmas I received balls of yarn, needles, and an instructional CD-rom. I didn’t know how to knit, but my mom was right in guessing I would enjoy learning how. Then two years ago I received fabric and a pattern for my birthday, now I have a new wall hanging!

Graduation 055

Preparing to celebrate my brother’s graduation back in 2007

DSC00689

Showing off handmade items at the Chilhowee Fair


2. I like denim.

My mom has always had a thing for denim. Denim jeans, jumpers, dresses, capris, and shirts. While I’ve always liked denim jeans recently I’ve acquired several denim shirts and just the other day my mom told me about the new Gap denim dress she got while I told her about my new Gap denim jacket.

statefair 007

Posing at the State Fair with her award winning denim skirt

IMG_4733

Wearing a denim shirt while touring around the National Mall


3. I can’t say no.

We are both hesitant to say no to anything. From helping a friend with a sewing project to volunteering. But I also think that is where my willingness to explore new places and try new things comes from (and willingness to sing with the band).

DSC05428

Singing along with the band 

DSC01228

Traveling through Germany, one Christmas Market at a time


make: Custom tote bags

For my friend Jenn’s Bachelorette party weekend in Nashville I volunteered to make bags. I ordered canvas bags from Totebagfactory. They were decently priced and pretty good quality. They aren’t see through and the paint didn’t really even bleed through. They also have nice handles. The only problem with them was I ordered them about a week before I needed them and ended up having to stay up late finishing them instead of having a fun crafting Saturday.

My initial idea was to paint them, but then I started working on the design and everyone (Ok Brian and my friend Catherine) liked the design with everyone’s names the best. Adding people’s names would make painting a lot harder. So I thought of doing iron on. I ran by staples to pick up the special paper only to find out that the printer in my apartment building wasn’t compatible with the paper… ok back to painting.

I made the design using Microsoft Publisher. Catherine had sent me a design idea and I went with it. Its loosely based on a Fender guitar pick. The Nashville is a script and all caps for everyone’s name.

IMG_2616

I cut the guitar pick design out of plastic since I would be using it on all the bags. I started painting the gold with a foam pouncer while Catherine started cutting out everyone’s names. Since we would just be using each name once we just cut it out of regular paper. I also cut out Nashville out of the plastic, but it didn’t work out that well. The first one I used the pouncer brush to paint and it bled bad. So after that I used a paint pen and drew the Nashville that way. It was still nice to have the stencil to follow and it made all them come out uniform.

IMG_2619

To save time and to add some style we didn’t cut out the middle’s of the letters. I used the paint pen again for the names. Luckily all it took was overnight for them to dry then we filled them with bachelorette party essentials like advil and nail polish.

IMG_2620

make: embroidery hoop di hoop

I had some of my lady friends over a while back and decided to have a craft project for us to do while we hung out and chatted and drank mimosas. I thought a hoop craft would be fun. Once you stretch fabric in the hoop it is a blank canvas for embroidery, appliqué, painting, and/or gluing fabric or buttons. I ordered the hoops from Hobby Lobby. The 4 inch hoops were $0.99 a piece! Shipping was a bit more, but a pretty good deal. I also ordered some new felt, but otherwise I used materials I had on hand.

IMG_2274

I had some canvas I cut into squares to use as the background, but also had some other fabric if someone wanted a different look. Since it was around valentines day I was inspired to do a conversation heart. I free hand cut the heart out of felt then used a simple stitch to attach it to the canvas.

IMG_2279

I eyeballed the lettering too. I don’t remember how I decided on “You Rock” but I’m still enjoying my choice. To finish off I cut the canvas down to within about 3/4 inch from the hoop. Then I used a glue gun to fold the canvas down and glue it to the inside of the hoop.

IMG_2295

I set up all the supplies I could think of on my desk, hoping to spark the creativity in my friends and see what people would come up with. I had a box of embroidery thread, several colors of felt, bits and pieces of fabric and leather, and buttons. The results are amazing!

IMG_2287

So many different interpretations from the same supplies. What would you make?

IMG_2285

make: kindle holder

For Christmas Brian got me a Kindle Fire. I had an old Sony eReader, and since Sony had since gotten out of the eReader business, it was starting to not work so well. So the Kindle was much appreciated and enjoyed but as soon as I took it out of the box I started worrying that I would scratch the screen. So I stared looking online for a case. I didn’t want a big case because I wanted to be able to easily slip the kindle in my purse to carry around and read whenever I had a moment. I didn’t want a boring case either, because well… I’m not boring. Nor did I want an expensive case. So I decided to make a case! More of a sleeve really.  I didn’t put a lot of thought or planning in to it, one could say I didn’t put enough, but I think it turned out great in the end!

IMG_2881IMG_2880

I started by finding a movie on TV. I picked The Hundred-Foot Journey and picked out my fabric from the craft cabinet. I decided on some fun batik fabric for the inside, a layer of thin batting for padding and some grey felt for the outside that won’t show dirt. Here is where a little more planning would of come in handy. I just kind of eyed a seam allowance around the kindle and cut out a rectangle.

IMG_2876

I sewed the three layers of each side together on three sides and turned it right sides out. I ironed the pieces and ironed the open ends under to prepare for sewing them together. I put the open ends on the bottom so when I sewed them together I closed the openings too!

IMG_2877

I used a contrasting blue thread for an additional pop of color. To secure the kindle inside I cut a rectangle of leather and sewed one side to the back. I had some large snaps on hand that I decided to use. I sewed the one side to the sleeve and then glued to other side of the snap to the leather. I used my E600 permanent craft glue and so far it has held amazingly well. I can tug the snap by the leather and there is no sign of the snap coming off.

IMG_2878

I think it turned out great and I’ve been using it for a few weeks now with zero issues. What would I of done differently? I might assemble the pouch differently, sewn the outside together than the inside instead of the top then bottom. The Kindle fits perfectly, I would of made it a touch bigger and a touch longer as the end sticks out a tiny bit (good thing I made a closure!).

make: easy “doughnuts”

For the brunch I hosted a few weeks ago I wanted to serve some type of bread. I was feeling uninspired and browsing the quick breads at the supermarket when I saw the idea to use a muffin mix to make baked doughnuts. It sounded interesting enough so I gave it a try. I bought the box of Krusteaz cranberry orange muffin mix and headed home.

IMG_2278

It is super easy. Just mix up the batter and put it in a zip lock bag. I used the gallon size and snip the corner. Then draw circles! The instructions also said you could use one of those doughnut pans, but unnecessary I say! As you can see below I wasn’t exactly neat and precise in drawing my circles, but it didn’t matter the oven corrected everything!

IMG_2269

I cooled them on a rack and mixed an icing of powdered sugar and orange juice to drizzle over the top.

IMG_2271

It made a ton! Maybe 3-4 dozen? And they were a hit. They were softer and fluffier than a doughnut or a muffin so they made a light sweet treat.